07/October - Basic knowledge of CSS (Cascading Style Sheet)
Preparations
1. Watch these Videos
- Why Is CSS So Weird? - Theory & history
- Learn CSS in 20 Minutes - Practice
- Learn CSS Flexbox 15 Minutes - Practice
- Learn CSS Grid 20 Minutes - Practice
2. HTML class practice repository on Github
We'll continue to apply some style to the journal we started building in our previous session Basic HTML
Class Curriculum
| Section content | Expected time (mins) | Pre - Requirements |
|---|---|---|
| Lesson Agenda and Goals | 5 minutes | ❌ |
| Questions from last session | 15 minutes | ❌ |
| Live demo on basic CSS | 25 minutes | Preparations section |
| Review CSS Activity task as a whole class | 10 minutes | ❌ |
| Class break | 10 minutes | ❌ |
| CSS Activity (in smaller groups) | 45-60 minutes | VsCode and Git installed |
Lesson Goal
Understand what CSS is, why we use it and how we can apply it to style HTML pages
CSS - What is it?
CSS (Cascading Style Sheets) is a declarative language that controls how webpages look in the browser. The browser applies CSS style declarations to selected elements to display them properly. A style declaration contains the properties and their values, which determine how a webpage looks.
CSS is one of the three core Web technologies, along with HTML and JavaScript. CSS usually styles HTML elements, but can be also used with other markup languages like SVG or XML.
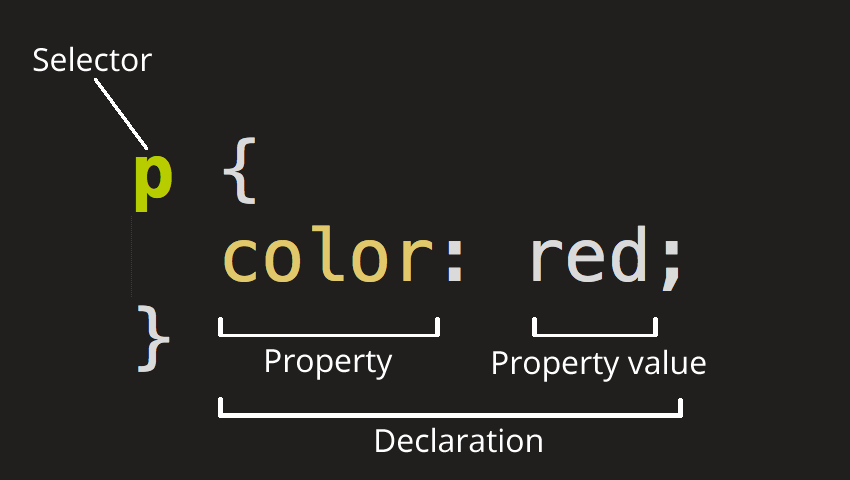
CSS Rule
A CSS rule is a set of properties associated with a selector. Here is an example that makes every HTML paragraph yellow against a black background:
1/* The selector "p" indicates that all paragraphs in the document will be affected by that rule */
2p {
3  /* The "color" property defines the text color, in this case yellow. */
4  color: yellow;
5
6  /* The "background-color" property defines the background color, in this case black. */
7  background-color: black;
8}
How does CSS Actually Work
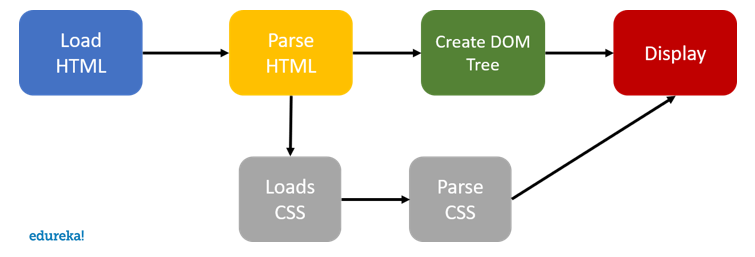
When a browser displays a document, it must combine the document's content with its style information. It processes the document in a number of stages, which we've listed below. Bear in mind that this is a very simplified version of what happens when a browser loads a webpage, and that different browsers will handle the process in different ways. But this is roughly what happens.
-
The browser loads the HTML (e.g. receives it from the network).
-
It converts the HTML into a DOM (Document Object Model). The DOM represents the document in the computer's memory.
-
The browser then fetches most of the resources that are linked to by the HTML document, such as embedded images and videos ... and linked CSS! JavaScript is handled a bit later on in the process, and we won't talk about it here to keep things simpler.
-
The browser parses the fetched CSS, and sorts the different rules by their selector types into different "buckets", e.g. element, class, ID, and so on. Based on the selectors it finds, it works out which rules should be applied to which nodes in the DOM, and attaches style to them as required (this intermediate step is called a render tree).
-
The render tree is laid out in the structure it should appear in after the rules have been applied to it.
-
The visual display of the page is shown on the screen (this stage is called painting).
How CSS is structured
There are typically 3 ways we do that to include CSS in a HTML Page:
- Inline CSS
1<h1 style="color: blue">Hello world!</h1>
- Internal CSS
1<head>
2  <style>
3    h1 {
4      color: blue;
5    }
6  </style>
7</head>
- External CSS
1<head>
2  <link rel="stylesheet" href="style.css" />
3</head>
CSS Selectors
- Element
The first way to select an HTML element is by simply using the name:
1h1 {
2  font-size: 20px;
3}
4p {
5  color: green;
6}
7div {
8  margin: 10px;
9}
We are selecting different elements like h1, p, div and giving them different style attributes. The font-size controls the size of the text, color sets the text color, and margin adds spacing around the element.
- Class
Another way of selecting HTML elements is by using the class attribute. In HTML, we can assign different classes to our elements. Each element can have multiple classes, and each class can also be applied to multiple elements as well.
1<div class="container">
2  <h1>This is heading</h1>
3</div>
4
5.container { background-color: blue; }
In the code above, we have assigned the class of container to the div element. In the stylesheet, we select our class using .className format and giving it a blue background color.
- ID
Like classes, we can also use IDs to select HTML elements and apply styling to them. The only difference between class and ID is that one ID can be assigned to only one HTML element in one page.
1<div>
2  <p id="para1">This is a paragraph</p>
3</div>
4
5#para1 { color: green; font-size: 16px; }
Activities
-
Add a style sheet to the journal you were working on previously, and change the colors, fonts, etc. of your journal. Be creative here! Make sure to commit and push the changes to your repository afterwards. Some example tasks:
- Change the color and font size of all of the h1 (large heading) tags (hint: use element selection)
- Create several CSS classes to style the color, font, font size, background color, and alignment of text. Apply these classes to several elements of your journal.
- Create an "id" to select a particular paragraph or div in your journal and style (i.e. change the color or background of the paragraph or div).
-
(optional - it's ok if you don't get to this task!) Spend some time working through Grid Garden with your partner.
-
(optional - it's ok if you don't get to this task!)Spend some time working through CSS Diner with your partner.
Extra resources
- Learn to style HTML using CSS
- Build a Classic Layout FAST in CSS Grid
- Inspecting the CSS Cascade using Firefox DevTools
- Flexbox Froggy