28/04 - Basic knowledge of CSS
Preparations
1. Revise HTML Basics
- What's a HTML element?
- What's a HTML tag?
- What's a HTML attribute?
2. Watch these Videos
- CSS in 100 Seconds - 2:19
- CSS explained in 5 minutes - 8:15
- Learn CSS in 20 Minutes - 23:43
Class Curriculum
| Section content | Expected time (mins) | Pre - Requirements |
|---|---|---|
| Questions from last session | 15 minutes | ❌ |
| Lesson Agenda and Goals | 5 minutes | ❌ |
| CSS Basics explained | 20 minutes | Preparations section |
| Live Demonstration of CSS Basics | 25 minutes | HTML Basics |
| Class break | 10 minutes | ❌ |
| CSS Activity (in breakout rooms) | 45-60 minutes | VsCode and Git installed |
Lesson Goal
Understand what CSS is, why we use it and how we can use it to style our webpages.
CSS - What is it?
CSS (Cascading Style Sheets) is a declarative language that describes the presentation of a document written in a markup language such as HTML. The browser applies CSS style declarations to selected elements to display them according to the style sheet. A style declaration contains the properties and their values, which determine how a webpage looks.
⚠️ HTML allows us to structure the content of a webpage, while CSS allows us to change the look and appearance of the content.
How CSS actually works

When a browser displays a document, it must combine the document's content with its style information. It processes the document in a number of stages, which we've listed below. Bear in mind that this is a very simplified version of what happens when a browser loads a webpage, and that different browsers will handle the process in different ways. But this is roughly what happens.
-
The browser loads the HTML (e.g. receives it from the network).
-
It converts the HTML into a DOM (Document Object Model). The DOM represents the document in the computer's memory.
-
The browser then fetches most of the resources that are linked to by the HTML document, such as embedded images and videos ... and linked CSS! JavaScript is handled a bit later on in the process, and we won't talk about it here to keep things simpler.
-
The browser parses the fetched CSS, and sorts the different rules by their selector types into different "buckets", e.g. element, class, ID, and so on. Based on the selectors it finds, it works out which rules should be applied to which nodes in the DOM, and attaches style to them as required (this intermediate step is called a render tree).
-
The render tree is laid out in the structure it should appear in after the rules have been applied to it.
-
The visual display of the page is shown on the screen (this stage is called painting).
Include CSS in Projects
There are typically 3 different ways to include CSS in a project:
- Inline CSS
1<h1 style="color: blue">Hello world!</h1>
- Internal CSS
1<head>
2  <style>
3    h1 {
4      color: blue;
5    }
6  </style>
7</head>
- External CSS
1<head>
2  <link rel="stylesheet" href="style.css" />
3</head>
CSS Basics
CSS Rule
→ CSS rule is a set of style properties and values that are applied to an element through a selector.
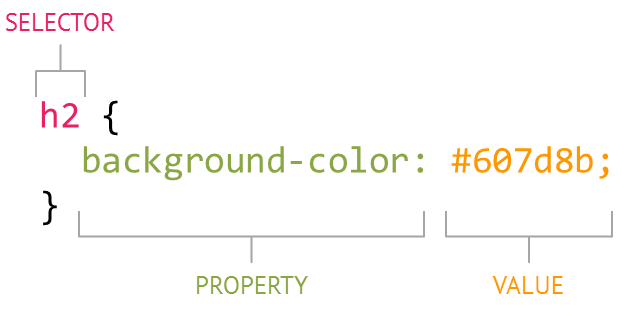
The selector "h2" indicates that all h2 in the document will be affected by that rule.
In this case the declaration stating background-color: #607d8b would give the h2 (selector) a background color of #607d8b, which declares a rule for the h2 element.
I am a h2 headline
CSS Selectors
Element
→ The first way to select an HTML element is by simply using the element/tag:
 1h1 {
 2  font-size: 20px;
 3}
 4
 5p {
 6  color: green;
 7}
 8
 9div {
10  margin: 10px;
11}
Attributes and values explained: Font-size controls the size of the text, color sets the text color, and margin adds spacing (10 pixels) around the element.
class
→ Another way of selecting HTML elements is by using the class attribute. In HTML, we can assign different classes to our elements. Each element can have multiple classes, and each class can also be applied to multiple elements as well.
1<div class="container">
2  <h1>This is heading</h1>
3</div>
1.container {
2  background-color: blue;
3}
In the code above, we have assigned a class called container to the div element.
In the stylesheet, we select our class using .className format and are giving the div with the class container a blue background color.
- Selecting an element by a class is more specific than selecting the element by the tag name.
- Classes are reuasable, and can be applied to multiple elements to style them the same.
id
→ Like classes, we can also use IDs to select HTML elements and apply styling to them - ids can and should ony be assigned to one HTML element per page and make it possible to target a unique element.
1<div>
2  <p id="description">This is a descriptive paragraph</p>
3</div>
1#description {
2  color: green;
3  font-size: 16px;
4}
👾 Practice CSS Selectors with CSS Diner 🎮
Pseudo-Classes
→ pseudo classes specify a special state of the selected element(s) that should be styled differently from the normal state → most commonly encountered found on styling anchor tags (links).
1a:hover {
2  color: red;
3}
This would make all links in the document turn red when the mouse is hovering over them.
CSS Flexbox
👾 Practice CSS Flexbox with Flexbox Froggy 🎮
CSS Grid
👾 Practice CSS Grid with the Grid Garden 🎮
Exercise
We'll continue to apply some style to the journal we started building in the Basic HTML session
- Open the
style.cssfile at the root of the journal project we worked on last session.
- Clear out all stylings and start from scratch (best for practicing), or add some more rules to the existing styles.
-
Change the colors, fonts, etc. of your journal. Some example tasks:
- Change the color and font size of all of the h1 (large heading) tags (hint: use element selection)
- Create several CSS classes to style the color, font, font size, background color, and alignment of text. Apply these classes to several elements of your journal.
- Create an "id" to select a particular paragraph or div in your journal and style (i.e. change the color or background of the paragraph or div).
Time to get creative! 🎨
-
Make sure to commit and push the changes to your repository.
-
(Optional) - Work through CSS Diner, Flexbox Froggy and Grid Garden with your group or alone to learn and practice CSS Flexbox and CSS Grid.
-
(Optional) - Try to improve the layout of your pages using CSS Flexbox/ CSS Grid.
Extra Resources
- Why Is CSS So Weird? - Theory & history
Chrome Developer Tools
→ A comprehensive toolkit for web developers, built directly into the Chrome browser
→ The Elements Tab shows you the HTML used to build the page you’re looking at, together with any inline CSS.
→ The Chrome Dev Tools are a great way to inspect the CSS cascade and see what styles are applied to an element.
→ Therefore great for debugging CSS and try out things in an preview environment and also getting inspiration from styles on other website.
https://www.youtube.com/watch?v=151NXMk0a2c
https://www.youtube.com/watch?v=25R1Jl5P7Mw
CSS Frameworks
Format on Save
- Toggle this options in your settings: Format on Save
- Or add this line to the
settings.jsonfile:"editor.formatOnSave": true